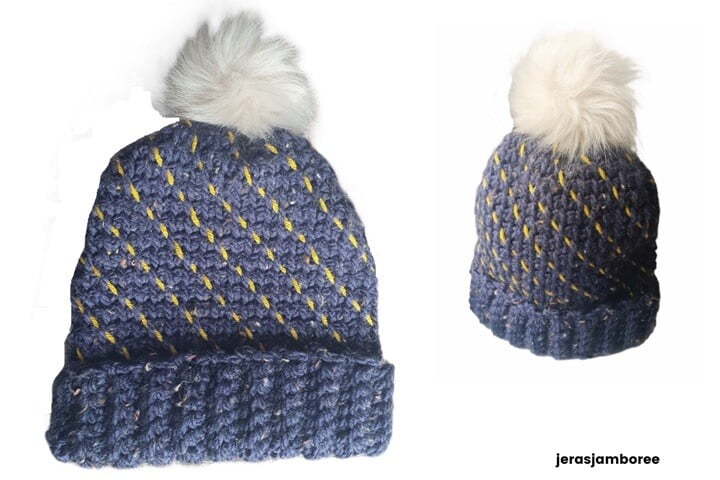
My fun and creative Tunisian crochet hat is designed for chunky yarn and the pattern comes in four adult sizes: Small (teen), Medium, Large, and Extra Large.
The body of the hat is worked in the beautiful Tunisian Simple Stitch, creating a stunning texture, while the ribbed brim (which uses single crochet back loop only) adds a classic touch.
One of the unique features of my pattern is the option for personalization. I’ve included instructions for weaving different coloured yarns through the vertical bars of the Tunisian Simple Stitch, allowing for many creative possibilities.
My design showcases yarn woven through the body of the hat in one direction, but feel free to experiment by adding your own twist and weave in any direction you like!
You can view the Dark Skies hat pattern for free below or you have the option to upgrade to a PDF in my Etsy and Ravelry stores.

To finish off your Tunisian hat, there’s an option to top it with a pompom. I’ve chosen a faux fur pompom for a stylish touch, but you can customize it to match your own style.
This project is perfect for a quick and satisfying crochet session since it doesn’t require much yarn. Whether you’re making it for yourself or as a gift, you’ll love how easy and customizable this pattern is!
- Why you’ll Love to Crochet this Tunisian Hat
- Level
- Supplies and Materials
- Gauge
- Glossary
- Measurements
- How the Tunisian Crochet Hat is Worked
- Related Tunisian Crochet Patterns
- Hat Pattern Notes
- Purchase the easy-to-read print-friendly PDF (ad free)
- Instructions Tunisian Crochet Hat
- Pin it for Later
- Join the Facebook Community
- Copyright Notice
- Bookmark this Content to Save for Later
Why you’ll Love to Crochet this Tunisian Hat
Join the Facebook Community
Join us to share your projects, discover new patterns, swap tips and tricks, and connect with a warm, welcoming community that loves all things crochet!
What You’ll Find:
- Inspiring patterns and tutorials
- Themed posts
- A supportive space to ask questions and share your progress
- Friendly chats with fellow yarn lovers
Join Our Crochet Facebook Group Now!
Don’t forget to answer the questions and accept the group rules.
Jera’s Jamboree receives payments for affiliate advertising. This is at no extra cost to you. As an Amazon Associate I earn from qualifying purchases. As a Cratejoy affiliate I earn if you click on a link and shop from my link. Please see my disclosure policy for more information.
Level
Easy (knowledge of Tunisian crochet is needed)
Supplies and Materials
- Chunky Yarn; approx. 165, (183, 203, 214) yds
- Small amount of yarn for optional weaving
- 8mm Tunisian Crochet Hook (body of hat) I was fortunate to have this set as a gift a couple of years ago and they feel so good!
- 6mm Standard Crochet Hook (brim)
- Faux Fur Pompom (optional) I use these faux fur pompoms with an elastic loop which wash well
- Stitch marker
- Scissors
- Yarn Needle
Yarn Choices
A maker at craft club bought her knitting along one week and she was using the softest chunky yarn. I’d been on the lookout for a while for a suitable yarn for this project and this was it! Trimm Serenity Luxury Yarn is a brand sold at local B&M stores and when I visited, there were only a few balls of white and navy left. I grabbed a couple of the navy balls for the body and brim of the hat.
The yarn I used is 97% acrylic and 3% viscose. It’s machine washable at 30 degrees on a warm wash and can be tumble dried on cool.
I already had the yarn I used for weaving in my stash. You don’t need much and can choose any weight and fibre you want. This is used to embellish the hat.
You can use any chunky yarn for my Tunisian hat and because it’s a smaller project and perfect for stash-busting, you might already have what you need. I would recommend you still crochet a swatch.
Gauge
10 stitches (Tunisian Simple Stitch) and 9 forward pass and return pass rows on a 8mm Tunisian hook = 10cm X 10cm / 4in X 4in
Glossary
Stitches
You will need to know how to work these stitches:
- Single Crochet (sc)
- Single Crochet Back Loop Only (scblo)
- Slip Stitch (sl st)
Special Stitch
Tunisian Simple Stitch (TSS) – see Pattern Notes for instructions
Abbreviations
- Forward Pass (fp)
- Return Pass (rp)
- Yarn Round Hook (yrh)
- Chain/s (ch/s)
- Each (ea)
- Repeat (rep)
- Stitch/es (st/s)
- Wrong Side (WS)
- Right Side (RS)
- Loop/s (lp/s)
Measurements
My pattern is written for four sizes of adult hat. The table below gives the measurements and the yarn amounts for each size.
Sample size is Adult Small.
| Hat Size | Head Circumference (inches) | Height (inches) | Approx. Yarn Amounts |
| Adult Small | 21 | 8.5 | 165 |
| Adult Medium | 22 | 9 | 183 |
| Adult Large | 23 | 9.5 | 203 |
| Adult Extra Large | 24 | 9.5 | 214 |
How the Tunisian Crochet Hat is Worked
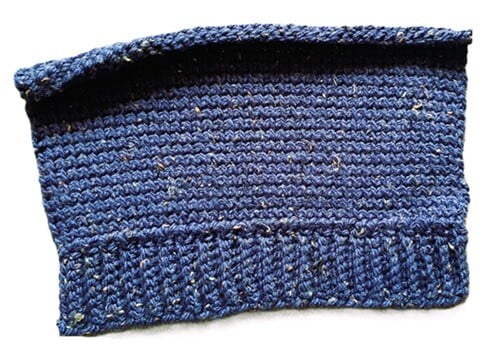
The body of the hat is worked in Tunisian Simple Stitch (TSS).
Once the body is finished, the yarn is continued to be worked for the brim (without fastening off). The brim uses a standard crochet hook and is worked in single crochet back loop only.
A long tail is left after fastening off the brim which is used to sew the side seam and cinch the hat at the top to give it shape.
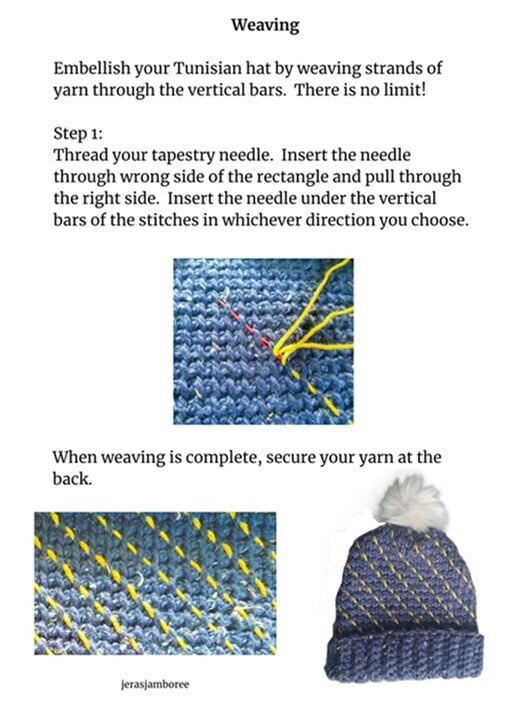
Optional Weaving
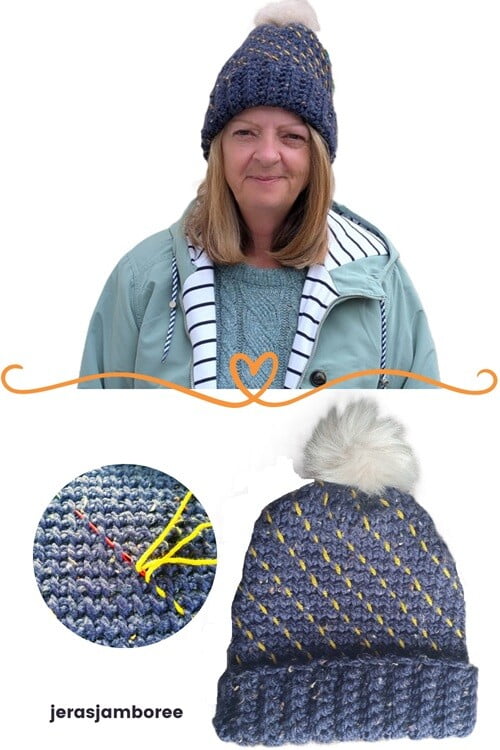
You have the option of embellishing your Tunisian hat by weaving strands of yarn through the vertical bars. I designed this project soon after the Perseids meteor shower and wanted to create a feeling of stars shooting across the sky. There is no limit to what you can do! you can weave in any direction and with any yarn. This adds uniqueness to your hat, be as creative as you want to be!
The TSS tends to curl but if you choose to weave yarn through the fabric, this stiffens it (the ribbed brim also alleviates the curl).
The image below gives instructions for how to weave the yarn through the body of the hat.
Assembly
The rectangle is folded in half and the side seam sewn.
The pompom is placed in the middle of the top on the inside (so that it will be on the right side of the fabric).
With the same length of yarn, you’ll weave through the top of the hat, making sure the pompom is securely attached before cinching it tight to give shape definition before fastening off.
And you’re done 🙂
Related Tunisian Crochet Patterns
You might also like:
Hat Pattern Notes
- Adult hat sizes are written thus: S, (M, L, XL)
- Multiples = any number of stitches.
- The body is worked in Tunisian Simple Stitch with an 8mm Tunisian Hook.
- The brim is written in US Crochet Terms and is working in single crochet back loop only with a 6mm standard hook.
- Chain one for the brim does not count as a stitch.
- Tunisian crochet is made up of a forward pass and a return pass. In the forward pass, stitches are worked onto the hook. In the return pass, stitches are worked off the hook.
- In the instructions, my pattern is written in the format of ‘steps.’ Step 1 and 2 are the foundation row. Step 3 and 4 are repeated for the remaining rows of the body of the hat.
- Step 1 is a forward pass, Step 2 is the return pass of the row. Step 3 is a forward pass with Step 4 being the return pass of the row.
- The loop on the hook for the forward pass counts as the first stitch so the first vertical bar is skipped.
- Weave in ends as you go.
The image below gives an example of working the TSS and how to work the end of a row.

This pattern is part of the Bundled Up Blog Hop

Click here for the main roundup post
The Dark Skies hat pattern will be free for 24 hours from 8am EST/1pm GMT 21st November 2024 to 8am EST/1pm GMT 22nd November 2024.
If you missed the blog hop, subscribe to the newsletter and be the first to know when a new pattern promotion takes place.
Purchase the easy-to-read print-friendly PDF (ad free)
The Tunisian hat pattern includes everything you need:
- how to work the stitches
- how the pattern is worked
- pattern notes
- clear written instructions
Instructions Tunisian Crochet Hat
Body of hat
With a 8mm Tunisian hook
Ch 52, (54, 57, 59) sts
Step 1 (fp): working into the back bumps of chs, TSS in 2nd ch from hook and in ea ch to end
Step 2 (rp): yrh, pull through 1 lp on hook, *yrh, pull through 2 lps, * rep until 1 lp left on hook
Step 3: (fp): TSS in ea st to end, work end st
Step 4: (rp): rep Step 2
Rep steps 3 and 4 until the body is a total of 18, (20, 22, 22) rows counting each step as a row
DO NOT FASTEN OFF
Change to standard 6mm hook
Ribbed Brim
Ch9
Row 1: sc in 2nd ch from hook, sc in ea ch, sl st in next 2 sts on brim edge, turn
Row 2: scblo in ea st to last st, sc in last st, ch1, turn
Row 3: sc in 1st st, scblo in ea st to end, sl st in next 2 sts on brim edge, turn
Rep rows 2 and 3 around
Fasten off leaving a long tail to sew seam and cinch top
If you are not embellishing your hat with weaving, continue to assembly.
Optional Weaving
Thread your tapestry needle with your yarn colour(s) of choice.
Insert the needle through WS of the rectangle and pull through the right side. Insert the needle under the vertical bars of the stitches in whichever direction you choose.
Secure both ends of the yarn on the back of the fabric.
Assembly
With the rectangle folded in half and working on the WS, sew the side seam from the brim to the top of the hat, sewing twice through the same last lp to secure it at the top.
With optional pompom:
Identify the middle st and use a st marker in this st. This is where the pompom will be sewn into the top
Weave yarn through the first half and cinch closed
Secure the pompom on the RS using the middle st (so that it will be on the right side of the fabric once the top has been cinched).
Continue to thread the yarn through the top of the hat and cinch closed
Fasten off
Without pompom
Weave the yarn through the top of the hat and cinch closed
Fasten off
Congratulations! Your Tunisian hat is ready to be worn.
Copyright Notice
The pattern and photographs of this design are the property of Sharon Goodwin at Jera’s Jamboree. This pattern and design are subject to copyright and are for personal, non-commercial use only. You may not share, resell, alter or redistribute this pattern in part or in whole. You may, however, sell any finished items you make. If you would like to include this pattern in a roundup, you may take one photo and link back to this pattern.
Bookmark this Content to Save for Later
To bookmark this content using the Grow.me app on Jera’s Jamboree, all you need to do is click the blue heart on the right-hand side of the screen and the Grow.me app will pop up.
If you don’t have a Grow account you will need to enter your email and create a password.
Once you’ve created an account, every time you want to bookmark content on my blog (or any others that use Grow), simply login to your Grow account.
If you forget your password, click the “forgot password” link and follow the prompts. Please note that I’m unable to assist with resetting Grow passwords or accessing your Grow account, so be sure to save your login information in a safe place.
With your Grow account you can:
- Share and bookmark posts.
- Subscribe to Jera’s Jamboree email crochet newsletter.
- Unlock content available only to subscribers.
Pin it for Later
No time now? Pin my Tunisian hat pattern for later
Wow, thanks so much‼️
Gr.
You’re welcome Arina